Have you ever had your outdoor security camera go off when you needed it most? It’s frustrating, right? A camera without power is like having no camera at all. As homeowners, we want to keep our homes safe, but sometimes, figuring out how to power outdoor security cameras can feel tricky.
Setting up the right power solution for your security camera can make all the difference, ensuring your property is safe 24/7.
This guide is here to make it simple. I’ll show you practical steps to keep your cameras powered, so you can Keep your home protected. Find out how to make sure your cameras never go dark.
Why Proper Power Setup is Essential for Outdoor Security Cameras

Think of relying on your outdoor camera to keep an eye on things while you’re at work or on vacation. But when you check the footage, you realize the camera lost power just when something important happened. Frustrating, right?
That’s why having the right power setup for your camera is critical. Outdoor security cameras are a key part of home safety, and when they go offline, so does your peace of mind. A reliable power source keeps your camera operational around the clock, giving you full coverage and reducing the chance of missed events.
While many homeowners don’t realize it, common issues like dead batteries, power outages, or even poor weather conditions can disrupt your camera’s power. Knowing how to prevent these problems is the first step in making sure your security system works without fail.
Different Power Options for Outdoor Security Camera: Battery, Wired, or Solar?
Before we dive into the step-by-step process, let’s talk about the different power options available for outdoor security cameras. Understanding these options will help you choose the best setup for your home.
1. Battery-Powered Cameras

Battery-powered cameras are a popular choice because they’re easy to install. There are no wires to deal with, which makes the setup a piece of cake. These cameras are perfect for areas where you don’t have access to an outlet or for homes where you want a more flexible camera placement.
Advantages:
- No need for electrical wiring.
- Can be placed almost anywhere.
Disadvantages:
- Batteries need to be replaced or recharged regularly.
2. Wired Cameras

Wired cameras are another common option, offering continuous power as long as they’re connected to a power source. They tend to be more reliable than battery-powered ones, but installation can be a bit more complicated since it involves connecting the camera to a power outlet.
Merits:
- Reliable power source.
- No need to worry about charging batteries.
Demerits:
- Requires professional installation or DIY electrical work.
- Camera placement is limited by proximity to power outlets.
3. Solar-Powered Cameras
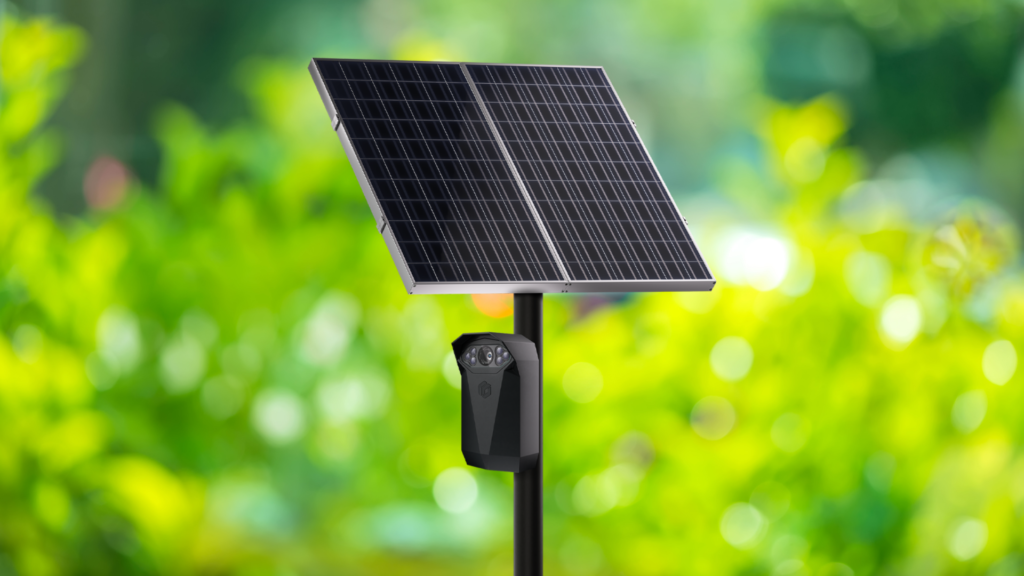
For homeowners looking to go green, solar-powered cameras are an excellent choice. They run on renewable energy, which makes them eco-friendly and low-maintenance. However, their performance is dependent on the amount of sunlight they receive.
Pros:
- Energy-efficient and environmentally friendly.
- Low maintenance once set up.
Cons:
- Sunlight is required to charge them.
- Not ideal for shaded or indoor areas.
How to Power Outdoor Security Camera
Now that you know the different types of power options, let’s get into the details of how to power your outdoor security camera properly. These steps will ensure you have a secure and reliable setup that works for your specific needs.
Step 1: Choose the Best Power Source for Your Outdoor Security Camera
The first step is selecting the right power for the installation process. Take into account the cameras you need, where you plan to place your camera, the climate, and how often you can perform maintenance like charging or replacing batteries.
1. For remote areas: If your camera will be placed far from your house or power outlets, a battery-powered or solar option is best.
2. For high-traffic areas: Wired cameras might work better since they can handle the constant recording without worrying about battery life.
Step 2: Install or Replace Batteries in Your Outdoor Security Camera
If you choose a battery-powered camera, follow these simple steps:
1. Check the battery level regularly: Most modern cameras come with apps that notify you when the battery is running low.
2. Replace or recharge: Depending on your camera model, either swap out the batteries or plug it in for charging
3. Extend battery life: You’ll need to optimize battery usage by adjusting the camera’s recording settings, like reducing motion sensitivity or scheduling recording times.
Step 3: Set Up Wired Power for Outdoor Security Camera
Wired cameras offer a more reliable power source, but installation is a bit more involved. Here’s how to set it up:
- Locate the nearest power outlet: Your camera will need to be placed close to a power source. Use an outdoor-rated extension cord if necessary.
- Mount the camera: Install the camera in its desired location, ensuring it’s within reach of the power outlet
- Connect the cables: Securely connect the power cable to both the camera and the outlet.
- Weatherproof the setup: Make sure all connections are sealed properly to prevent water damage or exposure to the elements.
Step 4: Use Solar Power for Your Outdoor Security Camera
Solar-powered cameras are a great choice if you live in a sunny location. Here’s how to set one up:
1. Position the solar panel: Place the panel in an area where it will receive maximum sunlight throughout the day.
2. Connect the camera to the solar panel: Follow the manufacturer’s instructions to properly connect your camera to the solar panel.
3. Maintenance tips: Clean the panel regularly to ensure it absorbs the most sunlight possible. Keep an eye on its performance during cloudy days.
Common Error Tips for Power Issues
Even with the best setup, power issues can happen. Here are a few common problems and how to fix them:
- Battery drains too quickly: Try adjusting your camera’s motion sensitivity or recording schedule to conserve power.
- Power outage: If you have a wired camera, consider using a backup power source like a UPS (Uninterruptible Power Supply) to keep the camera running during outages.
- Poor solar performance: Make sure the panel is clean and free from debris, and check for any obstructions that might be blocking sunlight.
Bonus Tips to Ensure Your Outdoor Security Cameras Stay Powered
To give yourself extra peace of mind, consider these bonus tips:
- Use a backup battery: For battery-powered cameras, having a fully charged spare battery on hand can save you from downtime.
- Install a smart plug: With smart plugs, you can control your wired cameras remotely, giving you more flexibility if power issues arise.
- Weatherproof your setup: Ensure that all connections are sealed, and consider using weatherproof covers for extra protection against the elements.
Conclusion
If you’re using a battery, wired, or solar-powered camera, knowing how to power outdoor security cameras is essential to keeping your home safe. A reliable power setup ensures your security system is always on and ready to capture important moments.
Check your current setup and make sure you have the right power solution in place. The last thing you want is to lose coverage when you need it most.
Secure your home 24/7? Follow these steps and power up your outdoor security camera today, and check out our blog on How To Choose The Perfect Rotating Outdoor Camera for more helpful tips.


4 comments
Excellent site. Lots of useful info here. I am sending it to several friends ans also sharing in delicious. And of course, thanks for your sweat!
Thank you
Pretty! This was a really wonderful post. Thank you for your provided information.
Thank you
Comments are closed.